Apache2 Configuration
To setup virtual hosts, we need to setup DNS zones. Go to /usr/local/samba/private/dns/ directory and edit patan.t311.zone file. Add these records at the bottom of the page.
intranet IN A 10.1.1.15
www IN A 10.1.1.15
*.client.patan.t311. IN A 10.1.1.15
ronald.patan.t311. IN A 10.1.1.15
patan.t311. 14400 IN MX 10 ronald.patan.t311.
After the changes are made restart samba by issuing this command
service bind9 restart
Intranet Site
The default website is enabled by default and can be reached using servers IP or
ronald.patan.t311
The index file looks like this:
<html><body><h1>It works!</h1>
<p>This is the default web page for this server.</p>
<p>The web server software is running but no content has been added, yet.</p>
</body></html>
Virtual Hosts
Go to /etc/apache2/ directory and create a file in sites-available, name it intranet.patan.t311. After creating the file add these parameters in it.
<VirtualHost *:80>
ServerAdmin webmaster@intranet.patan.t311
ServerName intranet.patan.t311
ServerAlias www.intranet.patan.t311
DocumentRoot /var/www/intranet/
ErrorLog /var/www/intranet/logs/error.log
CustomLog /var/www/intranet/logs/access.log combined
</VirtualHost>
Go to /var/www/ and create a new directory call it intranet. Create a log directory in intranet directory. Inside the directory of intranet create an index.html file and put some text like this.
<html><body><h1>It works!</h1>
<p>This is the Intranet web page for this server.</p>
<p>The web server software is running but no content has been added, yet.</p>
</body></html>
After all changes have been made, issue this commands.
a2ensite intranet.patan.t311
a2enmod vhost_alias
service apache2 restart
Head to a browser and type in http://intranet.patan.t311

Dynamic Virtual Hosts
Go to /usr/local/samba/private/dns/ directory and edit patan.t311.zone file. Add these records at the bottom of the page.
*.client.patan.t311. IN A 10.1.1.15
To test wild card is working we open cmd in Windows 7 client and type in nslookup ronald.client.patan.t311, this should show the IP addresss of the server.

Go to /etc/apache2/ directory and create a file in sites-available, name it vhost. After creating the file add these parameters in it.
<VirtualHost *:80>
ServerAdmin webmaster@patan.t311
ServerName client.patan.t311
ServerAlias *.client.patan.t311
<Directory />
Options FollowSymLinks
AllowOverride None
</Directory>
LogSQLTransferLogTable access_log
LogSQLTransferLogFormat AabcfHhIlMmPpRrSsTtUuvio
<Directory /var/www/%1/>
Options Indexes FollowSymLinks MultiViews
AllowOverride All
Order allow,deny
allow from all
</Directory>
ErrorLog /var/www/logs/client-error.log
LogLevel warn
CustomLog /var/www/logs/client-access.log combined
UseCanonicalName Off
LogFormat "%V %h %l %u %t "%r" %s %b" vcommon
VirtualDocumentRoot /var/www/%1/
</VirtualHost>
The client’s index.html files are placed in the /var/www/ronald/ directory. This similar to intranet site directory we created.
<html><body><h1>It works!</h1>
<p>This is the Ronald web page for this server.</p>
<p>The web server software is running but no content has been added, yet.</p>
</body></html>
After all changes have been made, issue this commands.
a2ensite vhost
service apache2 restart
Head to a browser and type in http://ronald.client.patan.t311

Apache Log Processing and Graphs
To enable apache log processing we need to install mod_log_sql.
wget http://www.outoforder.cc/downloads/mod_log_sql/mod_log_sql-1.101.tar.bz2
tar -jxvf mod_log_sql-1.101.tar.gz
cd mod_log_sql-1.101
./configure
Error starting aspx binary not found.
configure: error: *** The apxs binary installed by apache could not be found!
Follow this setups to fix this:
apt-get install apache2-prefork-dev
this package will include the new version of apxs2.
Apxs2 is located in /usr/bin/apxs2
Follow with normal install now.
./configure --with-apxs=/usr/bin/apxs2
make
make install
Go to cd mod_log_sql-1.101/contrib/, there is a file called create_tables.sql
We still need to have a logging database created and ready, so run the MySQL command line client and create a database:
apt-get install phpmyadmin
mysql –u root –p
Enter Password:
mysql> create database apachelogs;
mysql> use apachelogs
Database changed
mysql> source create_tables.sql
Create a specific MySQL userid that apache2.conf will use to authenticate and enter data. This userid need not be an actual Unix user. It is a userid internal to MySQL with specific privileges. In the following example command, “apachelogs” is the database, “loguser” is the userid to create, “my.apachemachine.com” is the name of the Apache machine, and “l0gger” is the password to assign.
mysql> grant insert,create on apachelogs.* to loguser@localhost identified by 'password';
Next we have to change the parameters in my.cfg which is located in /etc/mysql/ directory.
user = mysql
pid-file = /var/run/mysqld/mysqld.pid
socket = /var/run/mysqld/mysqld.sock
port = 3306
basedir = /usr
datadir = /var/lib/mysql
tmpdir = /tmp
lc-messages-dir = /usr/share/mysql
skip-external-locking
#
# Instead of skip-networking the default is now to listen only on
# localhost which is more compatible and is not less secure.
bind-address = *
Change the bind-address to * so that logging is available from other computers that doesn’t have localhost address.
Go to /etc/apache2/ directory and edit file apache2.config, at the bottom of the file add this lines.
LogFormat "%v:%p %h %l %u %t "%r" %>s %O "%{Referer}i" "%{User-Agent}i"" vhost_combined
LogFormat "%h %l %u %t "%r" %>s %O "%{Referer}i" "%{User-Agent}i"" combined
LogFormat "%h %l %u %t "%r" %>s %O" common
LogFormat "%{Referer}i -> %U" referer
LogFormat "%{User-agent}i" agent
# Include of directories ignores editors' and dpkg's backup files,
# see the comments above for details.
# Include generic snippets of statements
Include conf.d/
# Include the virtual host configurations:
Include sites-enabled/
LogSQLLoginInfo mysql://loguser:password@localhost/apachelogs
LogSQLCreateTables on
LogSQLDBParam socketfile /run/mysqld/mysqld.sock
LogSQLDBParam port 3306
Go to /etc/apache2/sites-available and edit vhost, add these following lines to it.
<VirtualHost *:80>
ServerAdmin webmaster@patan.t311
ServerName client.patan.t311
ServerAlias *.client.patan.t311
<Directory />
Options FollowSymLinks
AllowOverride None
</Directory>
LogSQLTransferLogTable access_log
LogSQLTransferLogFormat AabcfHhIlMmPpRrSsTtUuvio
<Directory /var/www/%1/>
Options Indexes FollowSymLinks MultiViews
AllowOverride All
Order allow,deny
allow from all
</Directory>
ErrorLog /var/www/logs/client-error.log
LogLevel warn
CustomLog /var/www/logs/client-access.log combined
UseCanonicalName Off
LogFormat "%V %h %l %u %t "%r" %s %b" vcommon
VirtualDocumentRoot /var/www/%1/
</VirtualHost>
After all changes have been made, issues the apache2 restart command:
service apache2 restart
Open the browser and type in http://ronald.client.patan.t311
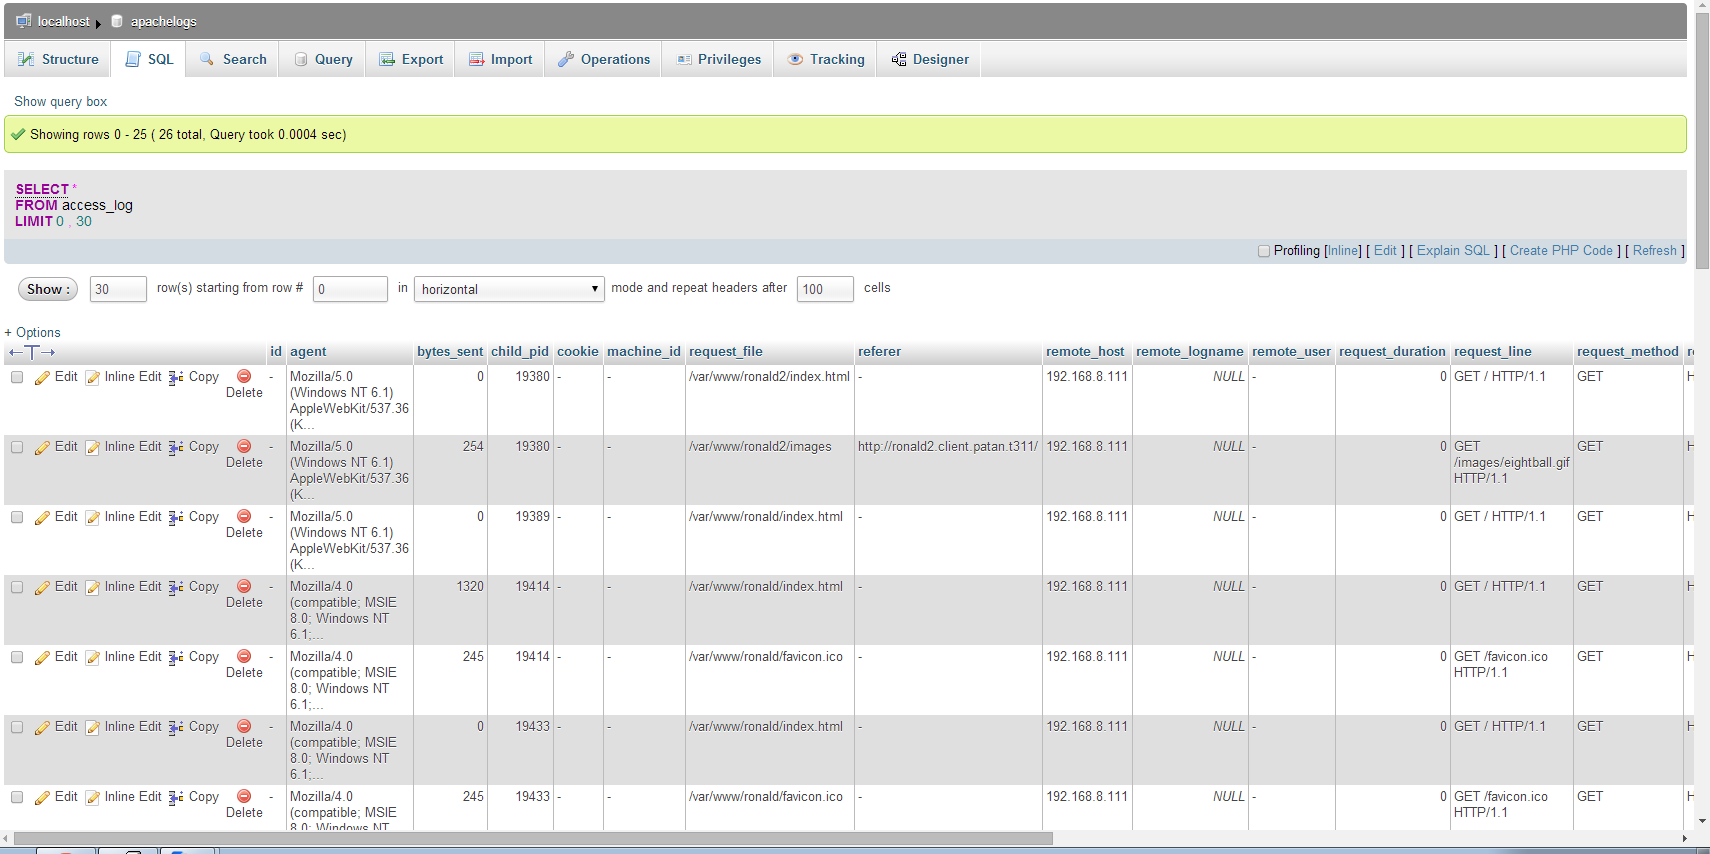
Go to http://192.168.8.115/phpmyadmin/
Username: root
Password: (password used for root account)
Find the database apachelogs, sql query an type in Select * from access-log.
This will show results:
Wabbit Setup
Next install Wabbit software from skol and install it on Windows 7 client.
Download and install Connector/J
http://dev.mysql.com/downloads/connector/j/
Open Wabbit, click on JDBC Driver and click on MYSQL add the Jar file which is located in
C:Program FilesMySQLMySQL Connector J

Create a new workspace and test if the Wabbit connects to MYSQL database properly.

SQL queries can be entered and charts are created as shown.
Top 10 Sites


Enjoy 😉