Samba 4
First we need to install bind9 and edit the named.conf.option file to forward queries to DNS server.
apt-get install bind9 resolvconf dnsutils
Edit the fle:
/etc/bind/named.conf.options
forwarders {
10.1.1.1;
};
Comment out this line.
//dnssec-validation auto; # Commented this line
forward only;
Now configure your server to use bind for DNS resolution by editing /etc/network/interfaces. Enter 127.0.0.1 as the only DNS nameserver.
Now do an ‘ifconfig eth0 down’ and an ‘ifconfig eth0 up’ and check the contents of the /etc/resolv.conf file, it should have 127.0.0.1 as the only nameserver.
Restart bind and check that you can resolve DNS names (such as nservices.bict.lab) from the Debian server using dig. Dig should report that it used 127.0.0.1 at the bottom of its output.
Restart bind to save the changes and also add this line into
/etc/networking/interfaces:
dns-nameserver 127.0.0.1
Now restart the interfaces using this command ifdown –a and ifup –a and now if you look at the /etc/resolv.conf file you will notice the changes are made.
# Dynamic resolv.conf(5) file for glibc resolver(3) generated by resolvconf(8)
#     DO NOT EDIT THIS FILE BY HAND -- YOUR CHANGES WILL BE OVERWRITTEN
nameserver 127.0.0.1
search patan.t311
Now you will see something similar to this.
After completing this tasks we are ready to install samba first do netstat –nap | grep 389 to check if samba port isn’t being used by any other program if it is need to resolve this before proceeding.
Make sure that the server is up-to date and has the latest versions by issuing the following commands
apt-get update
apt-get upgrade
Now to start with downloading and installing the latest samba 4 version, make sure wget is used to download the file in the main home directory.
wget http://www.samba.org/samba/ftp/stable/samba-4.1.9.tar.gz
We now need to verify that the file you have downloaded has not been altered or corrupted. Follow the steps outlined in the download webpage (URL above). Note you will need to change samba-version to samba-latest.
gpg --import samba-pubkey.asc
gunzip samba-latest.tar.gz
gpg --verify samba-release.tar.asc
Extract the tar file using the command:
tar -xvf samba-latest.tar.gz
Now install other essential software to make samba installation successful.
apt-get install build-essential libacl1-dev libattr1-dev libblkid-dev libgnutls-dev libreadline-dev python-dev python-dnspython gdb pkg-config libpopt-dev libldap2-dev libbsd-dev attr krb5-user docbook-xsl libcups2-dev samba4-clients
Now change directory and go to the extracted latest samba directory as shown below
cd samba-4.1.7
Do the following commands.
./configure --enable-debug --enable-selftest
Make
NOTE: the make step will take a while to compile Samba4.
make install
You will have to add the PATH variable for Samba4 in your machine.
export PATH=$PATH:/usr/local/samba/sbin:/usr/local/samba/bin
Save this path inside .bash_profile so that you do not need to export it every time you login after reboot
Or the other option you can run is :
/usr/local/samba/bin/samba-tool domain provision --use-rfc2307 --interactive --use-ntvfs
Now everything is ready, time to run the provision command
samba-tool domain provision
If you get the error for file system doesn’t support ext4 use this command:
/usr/local/samba/bin/samba-tool domain provision --use-rfc2307 --interactive --use-ntvfs
After the error are fixed , the domain can be now provisioned with the command
samba-tool domain provision or /usr/local/samba/bin/samba-tool domain provision --use-rfc2307 --interactive --use-ntvfs
The ‘domain provision’ tool should pick defaults for you automatically. Change to your configurations if it doesn’t suit your needs:
Realm [MYDOMAIN.COM]: PATAN.T311
Domain [MYDOMAIN]: RONALD
Server Role (dc, member, standalone) [dc]: dc
DNS backend (SAMBA_INTERNAL, BIND9_FLATFILE, BIND9_DLZ, NONE) [SAMBA_INTERNAL]: BIND9_FLATFILE
Administrator password:
Retype password:
If above was successful, should see something like this:
Creating CN=Administrators,CN=Users,DC=patan,DC=t311
Creating DomainDnsZones and ForestDnsZones partitions
Populating DomainDnsZones and ForestDnsZones partitions
Setting up sam.ldb rootDSE marking as synchronized
Fixing provision GUIDs
Kerberos config file is generated at:
“/usr/local/samba/private/krb5.conf”
Server Role: active directory domain controller
Hostname: ronaldp
NetBIOS Domain: ronald
DNS Domain: patan.t311
DOMAIN SID: S-1-5-xx-xxxxxxxxxx-xxxxxxxxx-xxxxxxxxxx
Note: Your domain provision might fail with errors,you need to delete the smb.conf which is located /usr/local/samba/etc/smb.conf. Run this command to fix errors:
/usr/local/samba/bin/samba-tool domain provision --use-rfc2307 --interactive --use-ntvfs
If that doesn’t fix the errors you may need to reinstall samba by doing make uninstall and going to the directory and deleting samba folder. Do a make and make install, follow the steps again to re-provision.
Edit the file /etc/bind/named.conf.local and add this line near the top:
include "/usr/local/samba/private/named.conf";
Restart bind9 using the command:
service bind9 restart
After bind9 restarts, check the end of /var/log/syslog to verify that samba_dlz has started for your realm.
You can also check that the realm’s zone is working by querying for the records that appear in it, for example:
host -t SRV _ldap._tcp.patan.T311
Should return some numbers and the name of your Samba 4 server.
_ldap._tcp.patan.T311 has SRV record 0 100 389 ronald.patan.t311.
Start Samba 4 using:
/usr/local/samba/sbin/samba restart
Run
smbclient –L localhost -U%
This should return list of shares.
Domain=[PATAN] OS=[Unix] Server=[Samba 4.1.5]
Sharename Type Comment
--------- ---- -------
netlogon Disk
sysvol Disk
homes Disk Home Directories
public Disk smb share
Share Disk smb share
IPC$ IPC IPC Service
Domain=[PATAN] OS=[Unix] Server=[Samba 4.1.5]
Server Comment
--------- -------
Workgroup Master
--------- -------
You can run “netstat –nap | grep samba/389” to see samba running with process.
You can check the samba version by running
/usr/local/samba/sbin/samba –V
Active directory uses a modified version of the Kerberos protocol for authentication. The provision command has sorted all this out for you, you simply need to copy the Kerberos config file into the correct place to enable it:
 mv /etc/krb5.conf /etc/krb5.conf.bak
 cp /usr/local/samba/private/krb5.conf /etc/krb5.conf
Check the krb.conf file has the relevant details of your domain.
Kerberos can be checked by using the previously installed krb5-user package and then:
kinit administrator@PATAN.T311
(MYREALM needs to be in uppercase and match the one specified while provisioning your domain.)
root@ronald:~# kinit administrator@PATAN.T311
Password for administrator@PATAN.T311:
Warning: Your password will expire in 34 days on Mon Aug 4 20:34:53 2014
Then
klist -e
Should return the details of a ticket.
Ticket cache: FILE:/tmp/krb5cc_0
Default principal: administrator@PATAN.T311
Valid starting Expires Service principal
01/07/14 14:07:00 02/07/14 00:07:00 krbtgt/PATAN.T311@PATAN.T311
renew until 02/07/14 14:06:56, Etype (skey, tkt): arcfour-hmac, arcfour-hmac
Setting Up Samba Startup Script
Retrieve the init script using
wget "http://anonscm.debian.org/gitweb/?p=pkg-samba/samba.git;a=blob_plain;f=debian/samba.samba-ad-dc.init;h=3132d2e367675f822342a5b7bc2e50c046aa3b8f;hb=HEAD" -O /etc/init.d/samba-ad-dc
The Debian package assumes that Samba is installed in /usr. If you’ve installed it in the default location (/usr/local/samba) instead, run:
sed -i 's|/usr/sbin|/usr/local/samba/sbin|g' /etc/init.d/samba-ad-dc
Likewise the Debian package assumes you’ll use /etc/samba/smb.conf for the configuration file. If you’re using the default location and build run:
sed -i 's|/etc/samba|/usr/local/samba/etc|g' /etc/init.d/samba-ad-dc
Make the init script executable by running:
chmod 755 /etc/init.d/samba4
Enable the script at startup
update-rc.d samba4 defaults
Install NTP so that time synchronization between the clients and the DC(s). Use
apt-get install ntp
Edit /etc/ntp.conf and include ntp.bict.lab as an NTP server and restart ntp. Check the servers time; if it is incorrect wait couple of minutes and check again.
You should now complete the following checklist before proceeding to add a PC to your domain.
| samba is the only process on port 389 (use netstat -nap | grep 389 to check) | □ |
| The server uses 127.0.0.1 to resolve DNS queries (use dig to check) | □ |
| The Windows 7 client uses your server to resolve DNS queries (use nslookup to check) | □ |
| From Windows 7 client run nslookup gc._msdcs.MYREALM – the returned IP address should be that of your Samba 4 server. | □ |
| The time and date on the server are correct (use date to check) | □ |
| The time and date on the Windows 7 client are correct | □ |
Join the Windows 7 client to the domain.
Right-click “My Computer” icon and choose “Properties”
From the left-side pane click “Advanced System Settings”
Choose the “Computer Name” tab and click “Change”
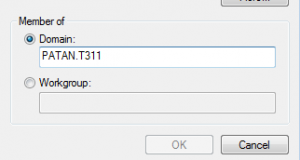
Select option “Domain”, and insert PATAN.T311
It requests a username and password type “Administrator” as the username and then enter your password. (The password you used when you ran the ‘samba-tool domain provision’ command)
You should get a message box stating ‘Welcome to the PATAN.T311 domain’
Click OK on this message box and the Properties window, and you will then be instructed to restart your computer.
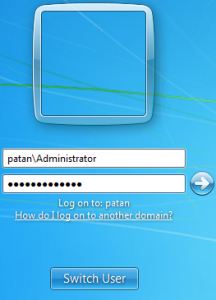
After restarting you should be presented with the normal login dialog. Click on ‘Switch User’ button.
Choose ‘Other user’ and then enter in the following:
Press Enter.
Enable ACL support for root ext4 file system
To enable this edit /etc/fstab file add the following line.
UUID=1665738c-8f14-49ab-a29c-cca45ae4a36f / ext4 user_xattr,acl,barrier=1 1 1
“Bolded part is the important part.”
Restart the system and changes will be applied.
Install remote admin tools
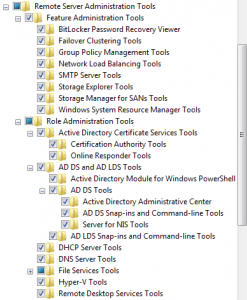
Head to Control Panel -> Programs -> Turn Windows features on or off -> Remote Server Administration Tools
The remote admin components you will need are; the AD DS Tools; the Group Policy Management Tools; the DNS Server Tools.
Create shares for Users
Go to /usr/local/samba/etc/smb.conf file and edit the file by adding lines to smb.conf.
[homes]
comment = Home Directories
browsable = no
read only = no
create mode = 0750
[public]
path = /media/storage/folder
public = yes
writable = yes
comment = smb share
printable = no
guest ok = yes
[Share]
path = /media/storage/folder
public = yes
writable = yes
create mode = 0755
directory mode = 0755
comment = smb share
printable = no
guest ok = yes
We need to create a folder in
/media/storage/folder
The two folders we created are storage and folder
Restart samba or the system to apply changes.
After the samba has restarted, on your Windows 7 go start and in the search bar type: \server ip and press enter.
This will show the new share we created.


