Setup mail server on Ubuntu 14.04.
This tutorial explains how to setup mail server on ubuntu 14.04 using postfix,dovecot and squirrelmail.
Please replace with your domain .
Installing and configuring postfix
Step 1 » Assign static IP and hostname and add a host entry for the host name .
Assign hostname in /etc/hostname
mail.krizna.com
Add a hostentry in /etc/hosts
192.168.1.10 mail.krizna.com
Step 2 » Update the repositories.
sudo apt-get update
Step 3 » Install postfix and dependencies . Press enter for all prompted questions during installation. we will do that in the next step.
sudo apt-get install postfix
Step 4 » After installation issue the below command to configure postfix.
sudo dpkg-reconfigure postfix
Now you will be prompted for set of details . choose the following values and replace krizna.com with your domain name.
1. Internet Site
2. krizna.com
3. krizna
4. krizna.com, localhost.localdomain, localhost
5. No
6. 127.0.0.0/8 [::ffff:127.0.0.0]/104 [::1]/128 192.168.0.0/24
7. 0
8. +
9. all
Step 5 » Now configure Postfix for SMTP-AUTH using Dovecot SASL by adding the below lines to postfix config file /etc/postfix/main.cf . home_mailbox value is the Mail directory will be created in users home directory.
home_mailbox = Maildir/ smtpd_sasl_type = dovecot smtpd_sasl_path = private/auth smtpd_sasl_local_domain = smtpd_sasl_security_options = noanonymous broken_sasl_auth_clients = yes smtpd_sasl_auth_enable = yes smtpd_recipient_restrictions = permit_sasl_authenticated,permit_mynetworks,reject_unauth_destination smtp_tls_security_level = may smtpd_tls_security_level = may smtp_tls_note_starttls_offer = yes smtpd_tls_loglevel = 1 smtpd_tls_received_header = yes
Step 6 » Now generate a digital certificate for tls. Issue the commands one by one and provide details as per your domain.
 openssl genrsa -des3 -out server.key 2048
 openssl rsa -in server.key -out server.key.insecure
 mv server.key server.key.secure
 mv server.key.insecure server.key
 openssl req -new -key server.key -out server.csr
 openssl x509 -req -days 365 -in server.csr -signkey server.key -out server.crt
 sudo cp server.crt /etc/ssl/certs
 sudo cp server.key /etc/ssl/private
Step 7 » Now configure certificate path
sudo postconf -e 'smtpd_tls_key_file = /etc/ssl/private/server.key'
sudo postconf -e 'smtpd_tls_cert_file = /etc/ssl/certs/server.crt'
Step 8 » Now enable submission for smtp access through 587. Open/etc/postfix/master.cf file and uncomment below lines.
|
1
2
3
4
5
6
|
submission inet n – – – – smtpd
-o syslog_name=postfix/submission
-o smtpd_tls_security_level=encrypt
-o smtpd_sasl_auth_enable=yes
-o smtpd_relay_restrictions=permit_sasl_authenticated,reject
-o milter_macro_daemon_name=ORIGINATING
|
Step 9 » Now install Dovecot SASL by typing the below command.
sudo apt-get install dovecot-common
Issue the following values for the prompts during installation.
1. yes
2. mail.krizna.com
Step 10 » Make changes to the files as follows.
Open /etc/dovecot/conf.d/10-master.conf file and find # Postfix smtp-auth line ( line no:95 ) and add the below lines .
# Postfix smtp-auth
unix_listener /var/spool/postfix/private/auth {
mode = 0660
user = postfix
group = postfix
}
Open /etc/dovecot/conf.d/10-auth.conf file and find (line no:100)
auth_mechanisms = plainand replaceauth_mechanisms = plain login
Step 11 » Restart postfix and dovecot services
sudo service postfix restart
sudo service dovecot restart
Step 12 » Now test SMTP-AUTH and smtp/pop3 port access .
Type the below command and should get below response.
telnet mail.krizna.com smtp Trying 127.0.0.1… Connected to localhost. Escape character is ‘^]’. 220 mail.kriznaa.com ESMTP Postfix(Ubuntu)
Type ehlo mail.krizna.com and should get below response , please make sure you get those bolded lines .
ehlo mail.krizna.com
250-mail.krizna.com
--------
250-STARTTLS
250-AUTH PLAIN LOGIN
250-AUTH=PLAIN LOGIN
---------
250 DSNand try the same with port 587 (telnet mail.krizna.com 587).
Postfix configuration is over, continue for dovecot installation.
Installing and configuring dovecot
Step 12 » Install dovecot using the below command
sudo apt-get install dovecot-imapd dovecot-pop3d
Step 13 » Now configure mailbox. Open /etc/dovecot/conf.d/10-mail.conf file and find (Line no:30 )
mail_location = mbox:~/mail:INBOX=/var/mail/%uReplace with
mail_location = maildir:~/Maildir
Step 14 » Now change pop3_uidl_format . Open /etc/dovecot/conf.d/20-pop3.conffile and find and uncomment the below line ( Line no : 50 )
pop3_uidl_format = %08Xu%08Xv
Step 15 » Now enable SSL . Open /etc/dovecot/conf.d/10-ssl.conf file and find and uncomment the below line ( Line no : 6 )
ssl = yes
Step 16 »Restart dovecot service.
sudo service dovecot restart
Step 17 » Now test pop3 and imap port access using the telnet command.
telnet mail.krizna.com 110
Trying 127.0.0.1...
Connected to localhost.
Escape character is '^]'.
+OK Dovecot (Ubuntu) ready.
Repeat the same for 995,993,143 ports.
OR check for listening ports using netstat command .
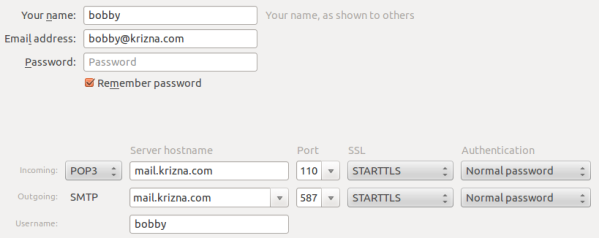
Step 18 » Create some users and check using mail clients like thunderbird or outlook
krizna@mail:~$ sudo useradd -m bobby -s /sbin/nologin
krizna@mail:~$ sudo passwd bobby
Now mail server is ready, you can send and receive mail using the server. Continue for squirrelmail ..
Installing and configuring squirrelmail
Step 19 » Install squirrelmail using the below command. This will install apache and PHP packages.
sudo apt-get install squirrelmail
Step 20 » Configure squirrelmail
sudo squirrelmail-configure
Everything is pre-configured , we just need to change Organization name .
Press 1 (Organization Preferences) » again press 1 (Organization Name) » Organization Name » Press S » Press Q to quit
Step 19 » Now configure apache to enable squirrelmail .
sudo cp /etc/squirrelmail/apache.conf /etc/apache2/sites-available/squirrelmail.conf
sudo a2ensite squirrelmail
Step 20 » Restart Apache service
sudo service apache2 restart
Step 21 » Now open http://serverIP/squirrelmail in your browser and login using username (bobby) . you can send and receive mail using squirrelmail.